Search This Blog

Monday, November 12, 2012

Difference Between KFF and DFF in Oracle Apps


Difference Between KFF and DFF in Oracle Apps
1.       Business Purpose
·         The business purpose of the KFF is to provide users a way to customize the key information structures and appearances in such a way that will be meaningful to a particular company.
·         The business purpose of the DFF is to capture additional information based on the company’s specific need that would otherwise not be tracked or would have required a customization.
2.       Database Structures
KFF:
a.       Stored separately in a combination tables
b.      Each segment of the KFF is mapped to a segment column in the combination table
c.       Maximum number of segments in KFF depends on the number of segment columns available in the underlying combination table
d.      A unique key is assigned to each unique KFF combination and is stored in the key ID column in the combination table
e.      We can have a Unique identifier for the KFF structure and it is stored in the structure id column in the combinations table
DFF
a.       Stored as part of the most of the oracle applications underlying database table, they are not stored in separate combination tables as like in KFF.
b.      Each attribute of the DFF is mapped to a attribute column in the combinations table
c.       Maximum number of attributes per context a DFF can have depends on the number of  attributes available in the underlying combination table.
3.       Flexfield Features
KFF:
a.       Flexifield qualifiers
b.      Segment Qualifiers
c.       Cross Validation Rules
d.      Enable shorthand entries
DFF:
a.       Context sensitive Flexfields

Tuesday, May 8, 2012

Payroll Costing and Transfer to General Ledger


What is purpose of Payroll Costing and Transfer to General Ledger ?
In Payroll area, the Costing process basically allocates payroll run which results to cost segments.
  • The Transfer to the General Ledger process transfers cost information to Oracle General Ledger interface tables.
  • At the installation - setting up segments of the Cost Allocation key flexfield to determine the windows in which users can select cost codes.
  • Oracle Costing you use a post–payroll run process to accumulate payroll costs.
  • For Oracle General Ledger you can map the segments of the Cost Allocation key flexfield to the corresponding segments of the General Ledger Accounting flexfield.
  • If you do not using GL in same product, you may consider how to relate information on labor costs entered in Oracle Human Resources to your financial systems 
     
    Who drives the payroll costing :Its Cost Allocation Flex field Segments
    • Define a structure for your Cost Allocation Flex field which contains the segments you want to use for your Business Group. You will use this structure to enter your payroll costing details in Oracle HRMS.
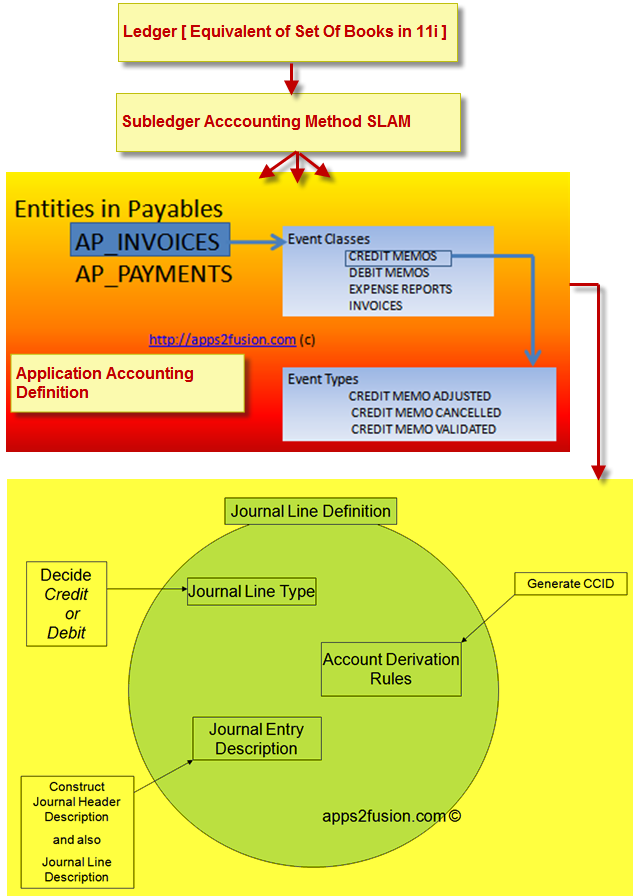
    • You use Segment Qualifiers to control the level at which costing information can be entered to the system. Each Qualifier determines the level at which costing information can be entered
       
      How it works
      The costing process picks up 'run results'. The specific 'payroll actions' that will be picked up by the costing process are in PAY_ACTION_CLASSIFICATION table and have a CLASSIFICATION_NAME of 'COSTED".
      So the process will create an assignment_action for every assignment that has a run result from one of the 'costed' classifications.
      The process then populates the PAY_COSTS table with the run result value (costed value). The actual cost code is stored on the PAY_COST_ALLOCATION_KEYFLEX table in the 'concatenated_segments' column, this is referenced using the 'cost_allocation_keyflex_id' from PAY_COSTS. (Adopted - Source metalink)
      When the Payroll costing results are transferred to Oracle General Ledger only the mapped segments and the costing amounts are transferred. The data is transferred from the PAY_COSTS table into the GL_INTERFACE table by running the Oracle Payroll process Transfer to GL. After the transfer from Payroll is complete, the batch will need to be imported into GL. This is done by running the Oracle General Ledger standard GL Import process .
      Transfer Program to GL process populates the following columns:
      • status
      • set_of_books_id
      • accounting_date : This is effective date of payroll run
      • currency_code
      • date_created
      • created_by :801...which is the application id for Payroll
      • actual_flag
      • user_je_category_name :hard-coded as Payroll
      • user_je_source_name :hard-coded as Payroll
      • entered_dr :the dollar amount to be debited
      • entered_cr :the dollar amount to be credited
      • reference21 :payroll_action_id of the transfer to GL process from pay_payroll_actions
      • reference22 :cost_allocation_keyflex_id from pay_cost_allocation_keyflex
      dgreybarrow Which program take care of payroll cost transfer.
      It is pytrangl.pkb, located in $PAY_TOP/patch/115/sql/pytrangl.pkb
      dgreybarrowWhat data is mapped from Payroll to General Ledger when information
      Similar to other Application transfer program, Payroll transfer populates the following reference columns in GL_INTERFACE:
      • Reference21 Payroll_action_id of Payroll Transfer to GL process
      • Reference22 :Cost_allocation_keyflex_id of Payroll cost flexfield for this entry
      • Reference23 :effective date of the Payroll Run this entry is derived from
      • Reference24  Date_earned of the Payroll Run this entry is derived from
      • Reference25 Payroll_action_id of Payroll Run this entry is derived from
      Journal import is then placed these in reference1, reference2, reference3, reference4 and reference5 in GL_IMPORT_REFERENCES table.
      The GL_IMPORT_REFERENCES columns are actually populated during the GL Journal Import process. Although these are mapped from the columns in the GL_INTERFACE table, the 'Transfer to GL' process does not actually populate the GL_IMPORT_REFERENCES table
      dgreybarrowTechnical Tables Involved
      • pay_assignment_actions
      • pay_action_interlocks
      • pay_assignment_actions
      • pay_gl_interface
      • pay_cost_allocation_keyflex
      • gl_import-refrence
      • gl_interface
      dgreybarrowStep for Payroll Tranfer To GL
      1) insert the following parameters in PAY_ACTION_PARAMETERS
      Costing results are generated based on the check date of the payroll process. However, you do have the ability to set the accounting date for the transfer to date earned rather than date paid. To do this you would need to change the TGL_DATE_USED pay action parameter to "E". If you do not do this then the accounting date of the transfer defaults to the check date of the originating payroll
       
      INSERT INTO PAY_ACTION_PARAMETERS VALUES ('TGL_DATE_USED','E');
      INSERT INTO PAY_ACTION_PARAMETERS VALUES ('TGL_REVB_ACC_DATE','Y');
      INSERT INTO PAY_ACTION_PARAMETERS VALUES ('TGL_GROUP_ID','Y');
       
      2) Setup your costing flexfield qualifiers.
      3) Create an element.
      4) Link the element : You need to check the costing radio button,and transfer to GL checkbox. Then you have to enter the values for the costing/balancing field.
      5) Then you need to run the quickpay/pre-payments/costing process
      6) Then you can track the ASSIGNMENT_ACTION_ID and PAYROLL_ACTION_ID navigating to View-->Payroll Process Results/Assignment Process Results
      7) Verify that the costing details are created in PAY_COSTS table.
      This is small query which you can use to get the details:
       
       
      SELECT * FROM PAY_COSTS WHERE ASSIGNMENT_ACTION_ID = &assignment_action_id;
       
      Then you need to run the Payroll transfer to GL process: Here are the data get inserted in GL Interface.
       
       
      SELECT gl.*
      FROM pay_payroll_actions ppa,
          pay_assignment_actions paa,
          pay_costs pcv,
          gl_interface gl
      WHERE ppa.payroll_action_id = :costing_payroll_action
      AND   ppa.action_type='C'
      AND pcv.transfer_to_gl_flag='Y'
      AND ppa.payroll_action_id = paa.payroll_action_id
      AND paa.assignment_action_id=pcv.assignment_action_id
      AND gl.user_je_source_name='Payroll'
      AND gl.reference22=TO_CHAR(pcv.cost_allocation_keyflex_id));
       
      9) Verify the data should be imported into gl_interfaces
      Do a quick check
       
      <pre>select * FROM gl_interface
      WHERE set_of_books_id =1003 --(set_of_books_id)
      AND GROUP_ID =123   -enter_group_id
       
      10) Then import the same in GL by navigating to Journal-->Import.
      dgreybarrow Running Transfer To GL Process
      1. Select View tab in the menu and then select requests
      2. Select Submit a New Request button
      3. Select Single Request radio button and then click ok button
      4. Now enter as follows
        Name : Transfer To GL
        Select the parameters Field then enter the Following details
        Payroll Name: enter the Payroll Name for which you want to Process
        Consolidation Set : Consolidation Set name of a Payroll
        Start Date : Select the Start Period for which you want to run the Payroll
        End Date: Period End Date
      5. Then after filling the above fields then select OK Button
      6. Select Submit button to submit the
      dgreybarrow Query to get Payroll data in GL side
      Here is small query that you can use to get the details of Payroll data from GL side.Script
      Let me know, if you have any question and comments for GL transfer of Payroll area.:)
       

Monday, April 16, 2012

SLA Part 10 - Testing and explaination of SLA Config

In the SLA articles Part 1 to Part 6, we understood the basic concepts of Subledger Accounting.
In the SLA articles Part 7 to Part 9, we configured SLA for Payables as an example.

In this article, we will test the configuration to see the results of the configuration performed in Part 7 to Part 9 of the SLA articles. We will also explain the results of the test.

Our SLA setup was done for Payables, hence we will create an Invoice in Payables and check the accounting entries to reconcile those against our SLA setup.


If you recollect, we created an AAD named ANIL_PAYBLES which is attached to Oracle Payables module. This AAD will invoke JLD named ANIL_JLD to build the journal lines when an event takes place against the Payables invoice.

In the image below we are creating an Invoice from Payables responsibility and ensuring its invoice line distribution account is 01-110-6100-0000-000.
Next we click on Actions button and validate the invoice and create accounting entries.


Now check the accounting generated by clicking on menu title Reports||View Accounting as shown in the image below.


You will notice that the Debit entry of 1000 is charged to 01-110-7450-0000-000 instead of being charged to 01-110-6100-0000-000 in the Invoice Distribution Line of Payables. Please note that the third segments value of 6100 from Invoice Distribution has been replaced by 7450 from ADR named ANIL_EXPENSE_ADR as shown below.  

The complete logic is described after this image.


Now, let us revisit how the credit line in the journal has been built. Typically Code Combination for the credit/liability accounting entry of the invoice line is picked from Payables Options setup of the operating unit. However in this case, in SLA we have hard coded the credit account to be 01.000.2220.0000.000. This was done by defining ANIL_LIABILIY_ADR as shown below. In this case the ADR returns the complete CCID because the Output Type radio button is set to Flexfield.

Hence, the SLA has generated the same Credit entry CCID for the invoice, as shown in image below
Needless to say that the ANIL_LIABILITY_ADR was attached to the Journal Line Type=ANIL_JLT_CREDIT.  

SLA Part 9 - Create Subledger Accounting Method

In previous article we have seen that in SLA, the "Application Accounting Definition" is created for each module in EBusiness Suite. However, in any implementation there is a need to perform accounting across various different modules. For example, a company named "APPS2FUSION UK" might be running Payables and Receivables and also Project Accounting. Hence we need to create a SLAM [Subledger Accounting Method] that will take care of generating the Accounting journal lines for each of the module.  Hence a SLAM is nothing but a grouping of all the AAD's possibly for a given chart of account.  

Using AAD we specify the Journal creation rules per module. In SLAM we specify the applications/modules for which the Journals must be built for the entire organization such as "APPS2FUSION UK" across Payables and Receivables and Project Accounting. The decision of whether the journal must be created is delegated to the AAD. As for how the journal is constructed and how the accounts are derived is delegated to the Journal Line Definition.

The company such as "APPS2FUSION UK" will have a legal entity in UK, and hence the SLAM will be attached to the UK Legal Entity.

In the image below we are creating a SLAM named ANIL_SLAM, and attaching the AAD named ANIL_PAYABLES. This is a simplistic example, because in reality you will have the AAD's of other applications like Receivables , Project Accounting, Fixed Assets etc attached to the SLAM as well.


In the above image, click on Accounting Setups, and here you can attach the SLAM to a Ledger. To remind you, in R12, the Ledger is equivalent of set of books in 11i.

SLA Part 8 - Creating Application Accounting Definition - AAD

In the previous part of this SLA article, you have learnt creation of the Journal Line Definition. Now it is time to create AAD, which is "Application Accounting Definition".
The purpose of AAD in SLA is to dictate which "Journal Line Definition" must be used when a specific event takes place against a specific type of transaction in a specific module like Payables or Receivables. If you recollect, the "Journal Line Definition" definition creates a Credit Line and the Debit Line of a Journal.

Oracle ships out of the box an AAD for every simply module/application that uses SLA.
Hence for each application like AP,AR,PA,PO etc there will exist an existing AAD in the Subledger Modules. However, for this example we will create a new AAD for Payables.

In the previous article you created a Journal Line Definition that is responsible for constructing a Journal. However, in AAD screen you will specify when the Journal Line Definition will be used. In this case, as per the image below, we are stating that journal line definition ANIL_JLD should be used for creating journal whenever any event occurs against an Invoice in Payables.


You can also click on "Header Assignment" button in AAD to attached "Journal Entry Description" [JED] which dictates how the Journal Header description will be constructed. If you recollect, in Journal Entry Description, we concatenate static text and dynamic content from SLA Sources[mapped to DB columns or pl/sql functions] so as to construct a description for Journal Line or Journal header.


In this article we have seen that AAD is created for each module. However, in any implementation there is a need to perform accounting for all the modules. "APPS2FUSION UK" might be running Payables and Receivables and also Project Accounting. Hence we need to create a SLAM-Subledger Accounting Method.

Using AAD we specify the Journal creation rules per module. In SLAM we specify how the Journals must be built for the entire organization "APPS2FUSION UK" across Payables and Receivables and Project Accounting. The company "APPS2FUSION UK" will have a legal entity in UK, and hence the SLAM will be attached to the UK Legal Entity.

SLA Part 7 - Creating Journal Line Definition

In this article we will create a Journal Line Definition. You will basically apply the steps learnt thus far into practical implementation.

However to create a Journal Line Definition, we need to create the following
1. Journal Entry Description for journal line description2. Journal Line Type to mainly define credit or debit3. Account Derivation Rules for CCID used in journal line
Therefore typically, two set of JED,JLT and ADR’s are required, with one set each for Credit line, and the other set for the debit line.

In this article, we will create these three components.


Go to a subledger like Payables and within the SLA menu as shown below, you can open the Journal Enty Description screen. Click on New to create a new JED.


Create a new Journal Entry Description named ANIL_JED. We will use this for generating the Journal Line Description for both the credit and the debit lines.


The journal line description can be constructed by clicking on Details button. The description of the journal line can be a static text or dynamic text based on database sources within SLA or the combination of the two.


Here we are using the Supplier Name to construct the journal line description.


In addition to the dynamic journal line text, SLA allows you to put conditions.
For example
IF CONDITION1=TRUE, then Journal Line Description should be abcd
ELSE IF CONDITION2=TRUE, then Journal Line Description should be defg

Click on condition button to define the condition

After defining the Journal Entry description, now we can create Journal Line Type named ANIL_JLT_CREDIT for the credit line of the journal.


Specify the Transfer to GL in Summary or Detail mode. Also specify Merge, as explain in image below


Use the Payables setup option as source to build condition for JLT


In this example, we want to build a condition for “Journal Line Type” eligibility depending upon whether in the Payables Options Screen has Automatic Offset Method is set to None or Balancing or Account. In the above condition, we have placed an OR condition.


You can for example also build a condition based on Invoice Distribution type as shown below.


Next we need to define the Account Derivation Rule


Here we are creating an account derivation rule for the credit line.

An ADR can either return a full CCID or a specific segment. The values can be sourced either statically or from existing seeded dynamic sources in SLA. These seeded sources are mapped to database tables.

We are stating that this specific ADR named ANIL_LIABILITY_ADR will return a constant value in company segment


In the above image you will see that the value for Company segment can be derived from the corresponding value set.

As below, it is also possible for the specific ADR to return a full segment combination. In fact you can specify conditions within an ADR. When CONDITION1=TRUE then segment combonation a.b.c.d is returned or when CONDITION2=TRUE then d.e.f.g combination is returned for your account.


For the debit side, we are saying that the Account segment must always be 7450

The conditions can be defined. But conditions as evaluated as per the priority.


Finally we create a Journal Line Definition.


Here everything hangs together, JLTJLD,ADR=Journal Line Defnition

As shown below, we are saying that the CCID for the Credit Line of the journal will be calculated from ANIL_LIABILITY_ADR


And the CCID for the debit line will be calculated by the CCID value in Invoice Distribution line, with the specific segment from Account segment being replaced as per ANIL_EXPENSE_ADR.

For example, if the CCID in AP_INVOICE_DISTRIBUTION equates A.B.C.D.E.F then your journal line debit entry will be A.B.7450.D.E.F


SLA Part 6 - Overall SLA Diagram

The overall flow of the SLA can therefore be depicted as shown in image below.


Overall, when you create new definitions in SLA, you can follow the bottom up model.
The parallel flow on top, as shown in image below is to ensure both a Credit and Debit line gets created for a Journal.